How to set up a functional kitchen workstation
Set Up Functional Kitchen Workstation Zone Prep Tip: Complete Guide for 2025
Introduction
Learning how to set up functional kitchen workstation zone prep tip is one of the most transformative changes you can make in your culinary space. Whether you’re a professional chef, passionate home cook, or someone who simply wants to improve meal preparation efficiency, establishing a well-organized kitchen workstation can revolutionize the way you cook. A functional kitchen workstation eliminates wasted movement, reduces stress during meal prep, and makes cooking more enjoyable overall.
Table of Contents
- Introduction
- Why Set Up Functional Kitchen Workstation Zone Prep Tip Matters
- Step-by-Step Set Up Functional Kitchen Workstation Zone Prep Tip Guide
- Best Set Up Functional Kitchen Workstation Zone Prep Tip Options
- Pro Tips for Set Up Functional Kitchen Workstation Zone Prep Tip
- Common Mistakes to Avoid
- Key Takeaways
- Frequently Asked Questions About Set Up Functional Kitchen Workstation Zone Prep Tip
- Conclusion
This comprehensive guide will walk you through everything you need to know about designing, organizing, and optimizing your kitchen workstations. From selecting the right location to choosing the perfect tools and gadgets, you’ll discover practical strategies that work in any kitchen size or layout. By the end of this article, you’ll have all the knowledge needed to create an efficient, beautiful cooking space that inspires you to spend more time in the kitchen.

Why Set Up Functional Kitchen Workstation Zone Prep Tip Matters
A properly designed kitchen workstation is the foundation of efficient cooking. When you set up functional kitchen workstation zone prep tip correctly, you minimize unnecessary movement, which means less fatigue during long cooking sessions. Studies show that professional kitchens with well-organized workstations increase productivity by up to 40%, and home cooks experience similar benefits in terms of cooking enjoyment and meal quality.
The psychological benefits of an organized workspace cannot be overstated. When your kitchen workstation is functional and clean, you experience less stress and anxiety while cooking. This positive mental state translates into better focus, improved decision-making while preparing meals, and ultimately, more delicious food on your table. A cluttered or poorly organized kitchen creates mental friction that discourages cooking and makes meal preparation feel overwhelming.
From a practical standpoint, an efficient kitchen workstation saves you valuable time every single day. Instead of searching for tools, running back and forth across the kitchen, or clearing space to prepare ingredients, everything you need is right at hand. This efficiency compounds over time—even saving five minutes per meal adds up to hours saved throughout the year. Additionally, a well-organized workstation reduces food waste by helping you keep track of what you have and use ingredients before they spoil.
Safety is another critical reason to set up functional kitchen workstation zone prep tip with intention. A properly organized station with adequate counter space and appropriate tool placement reduces accidents, cuts, and burns. Everything has its place, cables don’t create tripping hazards, and sharp tools are stored safely. When working with hot surfaces and sharp implements, having a logical layout means you can move confidently and carefully through your prep work.
Finally, a functional kitchen workstation reflects your personal cooking style and makes the space more inviting. Whether you love baking, meal prepping, or creating elaborate dinners, your workstation can be customized to support your specific cooking activities. This personalization makes you more likely to use your kitchen regularly and take pride in your culinary space.

Step-by-Step Set Up Functional Kitchen Workstation Zone Prep Tip Guide
Step 1: Choose Your Workstation Location
The first critical decision when you set up functional kitchen workstation zone prep tip is selecting the right location. Ideally, your primary workstation should be near your stove, sink, and refrigerator—the three points of a traditional kitchen work triangle. However, this isn’t always possible in modern kitchen layouts. Assess your kitchen’s natural flow and identify where you naturally gravitate during cooking.
Consider natural light when choosing your location. If possible, position your workstation near a window to take advantage of daylight, which helps with food preparation accuracy and creates a more pleasant cooking environment. Natural light also reduces eye strain compared to relying solely on artificial lighting.
Ensure your chosen spot has adequate counter space—ideally at least 24 inches deep and 36 inches wide for a comfortable primary workstation. If you don’t have this much space in one location, you can create multiple smaller workstations for different cooking tasks (prep zone, baking zone, cooking zone).
Step 2: Assess Your Needs and Cooking Style
Before purchasing anything, spend time thinking about how you actually use your kitchen. Do you cook multiple meals daily, or do you meal prep once a week? Are you primarily a baker, or do you focus on stovetop cooking? Your answers will dramatically influence how to set up functional kitchen workstation zone prep tip that works for your lifestyle.
Identify the most common tasks you perform in your kitchen. If you frequently chop vegetables, you’ll prioritize a large cutting board and sharp knives in your workstation. If you bake regularly, you’ll want easy access to mixing bowls, measuring tools, and your stand mixer. This self-assessment ensures your workstation serves your actual needs rather than following generic design principles.
Consider how many people cook in your kitchen simultaneously. If you cook with family members or roommates, you might need multiple workstations so people don’t bump into each other. Understanding your cooking habits prevents you from creating a beautiful but impractical setup.
Step 3: Install Appropriate Lighting
Proper lighting is non-negotiable for a functional kitchen workstation. Poor lighting causes eye strain, makes food preparation difficult, and can be a safety hazard. Most kitchens benefit from a combination of ambient lighting (overhead fixtures), task lighting (directed light over work surfaces), and accent lighting (for aesthetics).
Install a bright LED task light directly above your main workstation counter. This focused illumination makes chopping, measuring, and food preparation much easier. LED lights are preferable because they produce minimal heat, don’t flicker, and last much longer than traditional incandescent bulbs. The color temperature matters too—cool white light (4000-5000K) is ideal for task lighting as it mimics daylight and improves visibility.
Under-cabinet lighting is another excellent addition that illuminates your countertop without creating shadows. These strips are affordable, easy to install, and make a dramatic difference in functionality. Many are now LED with dimming capabilities, so you can adjust brightness based on your needs.
Step 4: Set Up Storage and Organization
Once you’ve chosen your location and optimized lighting, it’s time to organize storage. The most efficient kitchen workstations follow the “everything within arm’s reach” principle. Items you use daily should be easily accessible, while things you use occasionally can be stored further away.
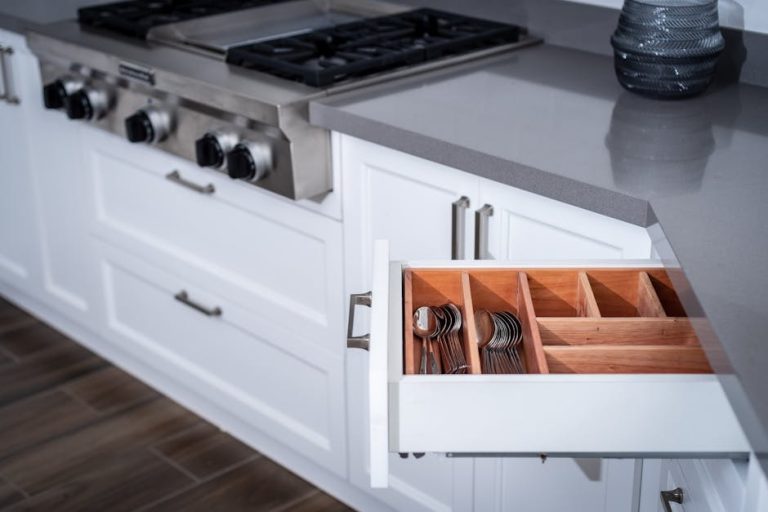
Use vertical space effectively with wall-mounted magnetic strips for knives, pegboards for frequently used tools, and shelving for mixing bowls and storage containers. Drawer dividers organize utensils and small tools so you can find what you need instantly. Clear storage containers let you see ingredients at a glance and stack efficiently in limited space.
Implement a logical organization system based on workflow. Store prep tools near your cutting board, baking supplies near your stand mixer, and cooking utensils near your stove. This logical arrangement means you don’t waste time searching for tools while your hands are full of ingredients or while something is cooking.
Step 5: Select Essential Tools and Gadgets
When you set up functional kitchen workstation zone prep tip, selecting the right tools is essential. Start with the basics: quality knives (chef’s knife, paring knife, serrated bread knife), cutting board, mixing bowls, measuring cups and spoons, and essential utensils. These foundational tools handle the majority of kitchen tasks across different cooking styles.
Add tools based on your specific cooking needs. Bakers should prioritize a stand mixer, while those who frequently make Asian cuisine might add a wok and proper spatulas. The key is choosing versatile, high-quality tools over accumulating single-purpose gadgets that clutter your workstation without adding real value.
Invest in good quality tools that will last years. A sharp, well-balanced knife makes food preparation safer and more enjoyable than a dull budget option. Quality tools actually save money long-term because they last longer and perform better.
Step 6: Create Designated Zones
If you have enough counter space, create different zones for different activities. A prep zone near your sink and cutting board, a cooking zone near your stove, and a finishing zone away from heat all reduce clutter and increase efficiency. Each zone should contain tools and ingredients relevant to that specific task.
A prep zone should include your cutting boards, knives, and bowls for collecting prepped ingredients. Your cooking zone should have your frequently used pots, pans, and cooking utensils within easy reach of the stove. A finishing zone might include plating tools, garnishes, and presentation supplies.
Labeling zones or containers makes it easier for other household members to understand your organization system and return items to the correct location. Clear labels also speed up your workflow when you’re in the zone and don’t want to waste mental energy remembering where things go.

Best Set Up Functional Kitchen Workstation Zone Prep Tip Options
Option 1: Compact Apartment Kitchen Workstation
For those with limited space, the key to a functional workstation is maximizing every inch. A fold-down or pull-out cutting board that stores flush against the wall gives you counter space when needed without permanently consuming precious real estate. Magnetic knife strips on the wall, over-the-door organizers, and stackable containers transform small kitchens into efficient workstations.
Vertical storage is crucial in compact spaces. Wall-mounted shelving, hanging pot racks, and pegboard systems get items off your counter while keeping them accessible. A small kitchen island with storage underneath can serve as your primary workstation and provide additional storage. Choose multi-functional tools like combination measuring cups or kitchen shears that can handle multiple tasks.
Small kitchen workstations require ruthless editing of your tool collection. Keep only items you actually use regularly and those that serve multiple purposes. A single high-quality knife might serve all your cutting needs better than a knife block with twelve rarely-used blades.
Option 2: Traditional Kitchen Layout Workstation
If you have a typical kitchen with dedicated counter space, you can create a more comprehensive workstation. Position your main workstation along one edge, arranging it to minimize travel distance to your refrigerator, stove, and sink. Use the full depth of your counter for storage, with frequently used items in front and occasional items pushed toward the back wall.
In traditional kitchens, you can afford to keep more tools out since storage space is less precious. However, still maintain the principle that daily-use items stay within arm’s reach while occasional tools are stored elsewhere. A well-organized kitchen workstation in a traditional layout can handle everything from quick weeknight meals to elaborate dinner parties.
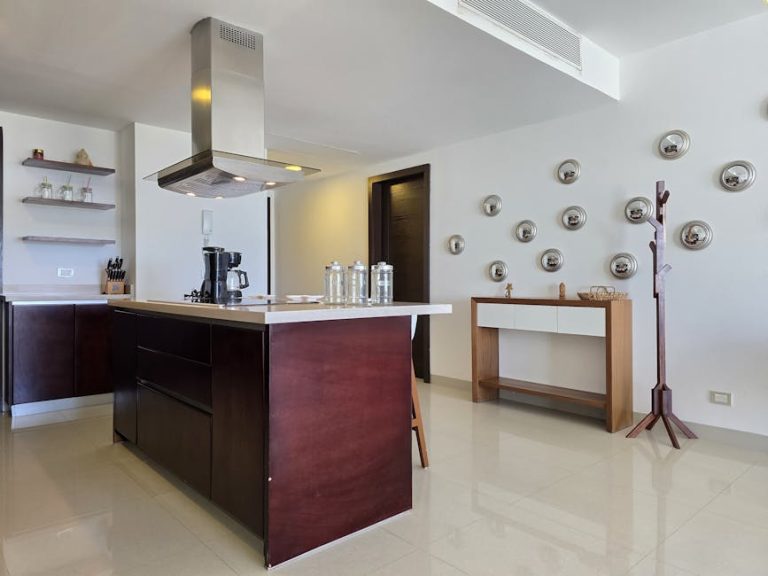
An island workstation works beautifully in traditional layouts, giving you multiple work surfaces and allowing people to work from different sides. Islands are ideal for cooking with children, as it provides space for supervision while they help prep.
Option 3: Professional-Style Home Kitchen Workstation
If you’re serious about cooking and have the budget and space, consider creating a professional-style workstation. This includes dedicated prep tables, properly sized and positioned cooking equipment, professional-grade knives, and comprehensive tool collections. Professional kitchens prioritize efficiency and ergonomics, principles that elevate home cooking spaces.
Professional-style workstations often include multiple distinct zones with appropriate equipment for each. A prep table separate from your main counter means you can have vegetables in various stages of preparation without cluttering your cooking area. Stainless steel surfaces are easier to sanitize and withstand heavy use better than traditional laminate counters.
These workstations require significant investment but pay dividends if you cook frequently and seriously. The improved workflow, better tools, and dedicated spaces actually make cooking faster, easier, and more enjoyable. Professional design principles work in any kitchen size when properly adapted.

Pro Tips for Set Up Functional Kitchen Workstation Zone Prep Tip
Invest in Quality Knives: A sharp chef’s knife is the foundation of any functional kitchen. One excellent knife often serves you better than a full knife block. Sharp knives make cutting safer and faster, and they inspire confidence in the kitchen. Keep your knives sharp with regular honing and periodic professional sharpening.
Use Proper Ergonomics: Your workstation height matters more than most people realize. Your elbows should bend at roughly 90 degrees when your hands rest on the counter. If your counter is too low, you’ll strain your back; too high, and your shoulders suffer. If your kitchen height isn’t ideal, add a cutting board riser or consider replacing your counter.
Organize by Frequency of Use: Apply the Pareto principle to your kitchen tools. The 20% of tools you use 80% of the time deserve prime real estate in your workstation. Everything else either gets secondary storage or removed from your kitchen entirely. This principle sounds simple but transforms actual functionality.
Create a Maintenance Schedule: Even well-organized workstations become cluttered over time. Establish a weekly reset routine where you clean, reorganize, and return items to their designated places. This 10-minute investment keeps your workstation functional and pleasant to use.
Batch Similar Activities: Group related tasks together to streamline your workflow. Chop all vegetables at once, then move them to your cooking area. Measure all baking ingredients into a bowl before you start mixing. This batching reduces mental load and minimizes the number of times you have to move around your workstation.
Label Everything: Especially in shared kitchens, clear labeling of storage areas, zones, and containers helps everyone understand your system. Even living alone, labels help you quickly locate what you need when you’re focused on cooking rather than searching.
Invest in Quality Containers: Clear, stackable containers with tight-fitting lids keep ingredients fresh and organized. Uniform containers stack efficiently and look more attractive than mismatched containers. Good containers actually save money by extending ingredient shelf life.

Common Mistakes to Avoid
Overcrowding Your Counter: The biggest mistake people make is keeping too many items on their main counter. Every item on your counter should serve a purpose or get used multiple times weekly. Decorative items and rarely-used gadgets belong in storage or removed entirely.
Ignoring Workflow: Placing your cutting board on the opposite side of the kitchen from where you store vegetables wastes time and energy with every meal. Your workstation layout should match your actual cooking flow, not generic design advice. Think about how ingredients move from storage to preparation to cooking to plating.
Neglecting Lighting: Underestimating lighting needs is a common error. Many people add task lighting only after experiencing eye strain and frustration. Proper lighting should be a priority, not an afterthought. It’s cheaper and easier to add adequate lighting during initial setup than to retrofit later.
Choosing Style Over Function: Beautiful doesn’t mean functional. A gorgeous knife block that’s hard to reach or a trendy gadget that takes up space without earning its place clutters your workstation without adding utility. Every item should earn its spot through regular use and genuine value.
Failing to Consider Height: Workstations that aren’t at proper ergonomic height cause back, shoulder, and neck strain over time. Even small height adjustments make a big difference in how much you enjoy cooking. Your comfort directly impacts how often and how happily you’ll use your kitchen.
Buying Single-Purpose Gadgets: Kitchen gadgets that do one thing are usually clutter. Your money is better spent on versatile, high-quality tools that handle multiple tasks well. A quality cutting board, for example, serves dozens of purposes better than a single-function tool.
Key Takeaways
- Position your workstation near your sink, stove, and refrigerator to minimize travel and increase efficiency while you cook
- Invest in quality knives, cutting boards, and essential tools rather than accumulating single-purpose gadgets that clutter your space
- Use vertical storage with shelving, pegboards, and magnetic strips to maximize space and keep frequently used items accessible
- Ensure adequate lighting with under-cabinet task lights and LED fixtures to reduce eye strain and improve visibility
- Organize items based on frequency of use, keeping daily essentials within arm’s reach and occasional items in secondary storage
Frequently Asked Questions About Set Up Functional Kitchen Workstation Zone Prep Tip
Q: What is the best set up functional kitchen workstation zone prep tip?
A: The best setup combines three elements: a location that minimizes travel to major appliances, adequate lighting for task work, and storage that keeps frequently used items accessible while maintaining clear counter space. Your ideal setup depends on your specific cooking style, available space, and frequency of kitchen use. A professional chef needs something different from someone who meal preps once weekly. The “best” setup is the one that matches your actual cooking habits and makes you enjoy spending time in the kitchen.
Q: How do I use set up functional kitchen workstation zone prep tip in a small kitchen?
A: In small kitchens, prioritize vertical storage using wall-mounted shelves, magnetic strips, and pegboards. Choose multi-functional tools, fold-away cutting boards, and stackable storage containers. Create a single efficient workstation rather than multiple zones. Focus ruthlessly on keeping only items you actually use regularly. Small kitchen efficiency comes from smart organization and editing, not from working with more items.
Q: How often should I reorganize my kitchen workstation?
A: A quick 10-minute reset once weekly keeps your workstation organized and functional. This involves cleaning the counter, returning items to their designated places, and checking that your organization still matches your actual workflow. Major reorganization might happen seasonally if your cooking patterns change significantly. If you find yourself constantly searching for items or struggling with your layout, that’s a signal that reorganization is overdue.
Q: What’s the ideal counter height for a kitchen workstation?
A: Standard kitchen counter height is 36 inches, which works well for most people. However, ideal height depends on your own body proportions and what you’re doing. Your elbows should bend at approximately 90 degrees when your hands rest on the counter. If standard height doesn’t work for you, add a riser beneath your cutting board, use a stool when you need lower work surfaces, or consider replacing your counter if you cook seriously enough to justify the investment.
Q: What tools are absolutely essential for a functional kitchen workstation?
A: Essential tools include a sharp chef’s knife, cutting board, mixing bowls, measuring cups and spoons, basic utensils (spoon, spatula, tongs), and a can opener. These fundamentals handle the majority of cooking tasks. From there, add tools based on your specific cooking interests. Bakers add stand mixers and measuring bowls; wok enthusiasts add proper spatulas; pasta lovers add a pasta maker. Start with essentials and add specialized tools only as you discover genuine need for them.
Conclusion
Learning how to set up functional kitchen workstation zone prep tip is an investment that pays dividends every single day. By carefully choosing your location, optimizing lighting, organizing storage, and selecting quality tools, you create a space that makes cooking faster, safer, and more enjoyable. Whether you’re working with a tiny apartment kitchen or a sprawling culinary space, these principles apply universally.
The most successful kitchen workstations reflect your personal cooking style and match your actual habits rather than following generic design rules. Take time to assess how you really cook, what tools you genuinely use, and what would make meal preparation more pleasant. This self-awareness produces workstations that you’ll love using for years to come.
Start small with one area if you’re overwhelmed by the prospect of redesigning your entire kitchen. Add lighting first, then organize one zone, then expand gradually. Your kitchen workstation will evolve as your cooking skills and interests develop. By committing to these principles and making thoughtful choices, you’ll transform your cooking space into a functional, beautiful area that makes every meal preparation a pleasure rather than a chore.
Recommended Products on Amazon
As an Amazon Associate I earn from qualifying purchases.