How to practice knife skills safely at home
How to Practice Knife Skills Safely at Home: The Claw Grip Tip and Essential Techniques
Learning how to practice knife skills safely at home claw grip tip is one of the most valuable investments you can make in your culinary journey. Whether you’re a home cook looking to improve your meal prep efficiency or an aspiring chef honing your craft, mastering proper knife techniques combined with the protective claw grip method is essential for both safety and precision. This comprehensive guide will walk you through everything you need to know about developing professional-grade knife skills in the comfort of your kitchen, complete with proven safety strategies, beginner-friendly exercises, and expert recommendations. By the end of this tutorial, you’ll understand not just the “how,” but the crucial “why” behind each technique that protects your fingers while dramatically improving your cutting ability.
Table of Contents
- Why Practice Knife Skills Safely at Home Claw Grip Tip Matters
- Step-by-Step Guide to Practice Knife Skills Safely at Home Claw Grip Tip
- Best Practice Knife Skills Safely at Home Claw Grip Tip Options
- Pro Tips for Practice Knife Skills Safely at Home Claw Grip Tip
- Common Mistakes to Avoid
- Key Takeaways
- Frequently Asked Questions About Practice Knife Skills Safely at Home Claw Grip Tip
- Conclusion
Why Practice Knife Skills Safely at Home Claw Grip Tip Matters
Knife skills are the foundation of culinary excellence, yet they remain one of the most overlooked areas in home cooking. When you practice knife skills safely at home claw grip tip, you’re not just learning to cut vegetables faster—you’re developing muscle memory that transforms how you prepare food every single day. The claw grip technique, in particular, is a safety mechanism that has protected professional chefs for decades, reducing hand injuries by up to 90% when used correctly.
The importance of mastering safe knife techniques extends beyond injury prevention. Studies show that home cooks who develop proper knife skills spend significantly less time on meal preparation, reduce food waste through more efficient cutting, and experience greater confidence in the kitchen. When you combine proper hand positioning with appropriate knife selection and cutting techniques, you create a powerful skill set that makes cooking more enjoyable and efficient.
Learning how to practice knife skills safely at home claw grip tip also has psychological benefits. Many home cooks experience anxiety around sharp knives, which paradoxically makes them more dangerous because nervous energy leads to tension and mistakes. By systematically building confidence through proper technique and proven safety methods, you’ll find yourself actually enjoying the meditative aspect of food preparation. The claw grip becomes second nature, allowing you to focus on the creative aspects of cooking rather than worrying about safety.

Step-by-Step Guide to Practice Knife Skills Safely at Home Claw Grip Tip
Understanding the Claw Grip: Your First Line of Defense
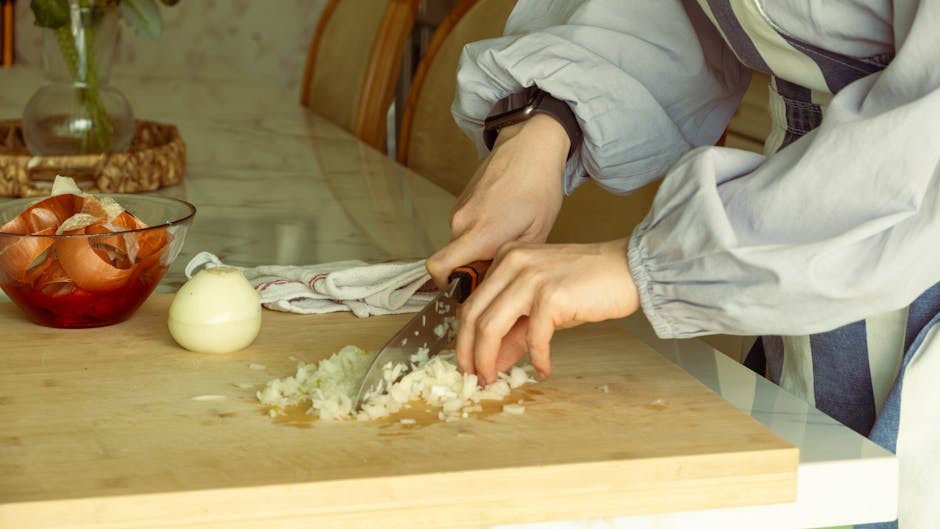
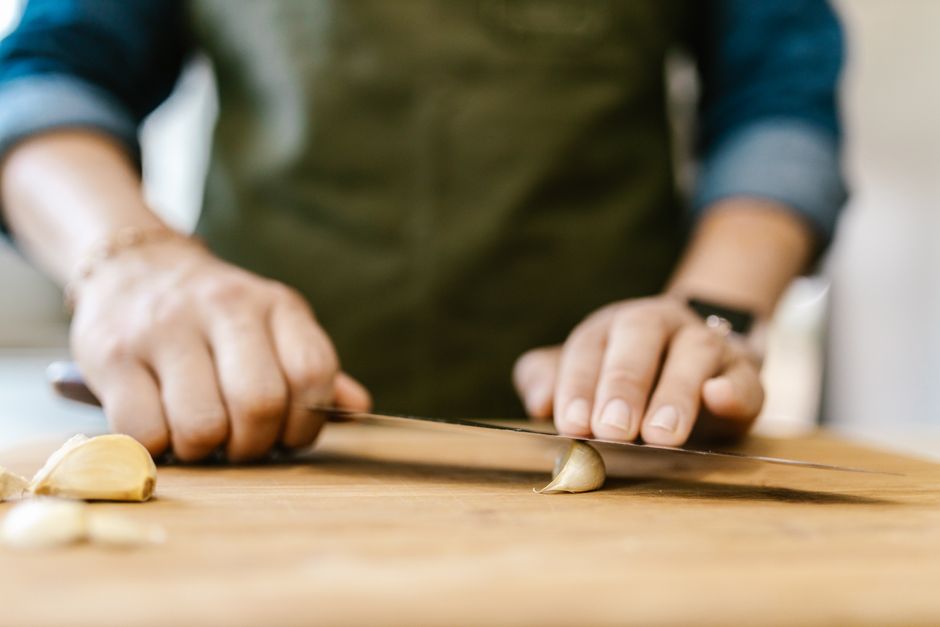
The claw grip is the cornerstone of safe knife practice, and it’s surprisingly simple once you understand the mechanics. Start by holding the food item—let’s use an onion as our example—in your non-knife hand with your fingertips curled inward like you’re making a claw with your hand. Your knuckles should be the highest point of your hand, forming a protective barrier against the knife blade.
Position your fingers inside the claw so that they are completely protected by your knuckles. The claw grip means your fingertips are never exposed and always tucked safely away from the knife’s path. Your middle knuckle becomes your guide, which the flat of the knife blade will rest against as you cut. This simple positioning adjustment is what separates safe cutting from dangerous cutting, making it absolutely essential to practice this before attempting any knife work.
Selecting Your Practice Knife
Before you begin practicing, you need the right knife. A chef’s knife between 8 and 10 inches is ideal for most home cooks because it’s large enough to feel controllable but not so large that it becomes unwieldy. Look for a knife with good balance, where the weight feels distributed evenly between the handle and blade rather than blade-heavy.
The blade material matters significantly for your practice sessions. Stainless steel knives are more forgiving for beginners because they’re easier to maintain and less prone to staining, while carbon steel knives hold an edge longer but require more care. For home practice purposes, a quality 8-inch chef’s knife in stainless steel will give you years of reliable service while you develop your skills.
Test the knife’s weight in your hand before committing to a purchase. It should feel like an extension of your arm, not something you’re fighting to control. The handle should be comfortable and non-slip, especially when your hands get wet during cooking. A good grip is fundamental to maintaining control and therefore maintaining safety throughout your practice.
Your First Practice Session: Starting With Soft Vegetables
Begin your knife skills practice with soft vegetables like tomatoes, bell peppers, or zucchini rather than harder items like carrots or root vegetables. Softer vegetables provide immediate feedback and require less pressure, which means you’ll experience greater control and confidence in your first session.
Place your cutting board on a stable surface at a height where your elbows are at a 90-degree angle when standing naturally. This ergonomic positioning prevents fatigue and ensures better control throughout your practice session. Wash your practice vegetable thoroughly and pat it completely dry—wet vegetables slip, which is the enemy of safe cutting.
Hold your chef’s knife with a firm but not tense grip. Your thumb and index finger should pinch the blade just above the handle, while your remaining three fingers wrap around the handle naturally. This grip gives you maximum control and allows for the rocking and slicing motions you’ll need for different cutting techniques.
Implementing the Claw Grip During Your First Cuts
Now comes the crucial moment: implementing the claw grip while making your first cuts. Place your bell pepper on the cutting board and form the claw grip with your non-knife hand, ensuring your fingertips are completely curled inward and protected by your knuckles. Rest the flat of your knife blade gently against your middle knuckles to establish the proper distance.
Make your first cut by gently moving the knife forward and down in one smooth motion, keeping the blade in contact with your guiding knuckles throughout. The blade does the work—you shouldn’t be applying excessive pressure. Your claw hand moves slightly backward after each cut, repositioning your knuckles to guide the next slice.
Repeat this motion slowly and deliberately at least 10-15 times on your first item. Speed is not the goal during these initial practice sessions; consistent, controlled movements that develop muscle memory are what matter. Once you’ve completed several cuts on your first vegetable, you’ll notice your body settling into the proper positioning naturally.
Progressing to the Three Basic Cuts
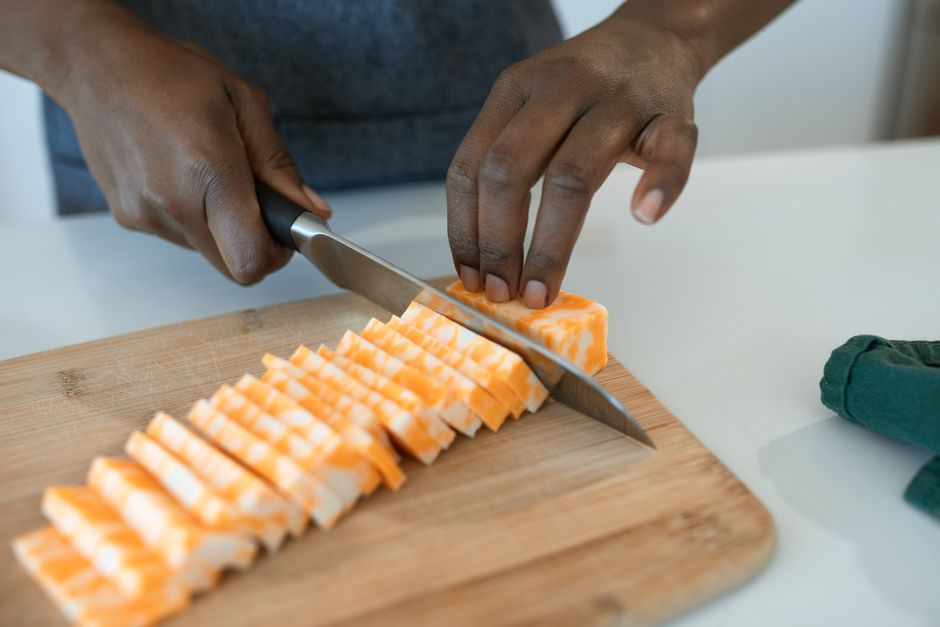
Once you’re comfortable with basic slicing, introduce the three fundamental cuts: the julienne (matchstick-sized pieces), the chiffonade (thin ribbons), and the dice (uniform cubes). Each cut builds on the claw grip foundation but introduces different hand and knife movements.
For the julienne cut, make thin vertical slices of your vegetable while maintaining the claw grip. Then stack these slices and cut them lengthwise into thin matchsticks. The claw grip protects your fingers as your hand repositions between the stacking and cutting phases. This cut teaches you how to work with different hand positions while maintaining safety.
The chiffonade requires you to roll leafy vegetables like basil into a tight cylinder and then make very thin cuts across the roll. Here, the claw grip keeps your fingers safe while your hand maintains tension on the rolled vegetable. The dicing technique combines slicing, stacking, and cutting in perpendicular directions, making it the most complex—and therefore the best final progression for your practice session.

Best Practice Knife Skills Safely at Home Claw Grip Tip Options
Choosing Your Training Vegetables
Different vegetables teach different lessons when you practice knife skills safely at home claw grip tip. Onions offer resistance and a pleasant smell that becomes satisfying once you’re comfortable with the technique. Carrots require more pressure and teach you how to adjust your force while maintaining control. Bell peppers are forgiving and provide visual feedback about your slice consistency. Tomatoes demand a gentle touch and teach you proper knife pressure.
Create a practice rotation that includes at least four different vegetables, spending 15-20 minutes on each during weekly practice sessions. This variation prevents boredom and builds more comprehensive skills than practicing with just one vegetable repeatedly. Your hands will develop different strengths and adaptability that transfer to all your cooking.
Cucumbers, zucchini, and leafy greens are excellent for practicing the claw grip because they’re forgiving and require minimal pressure. These vegetables are perfect for your first few sessions when you’re still building confidence. As your skills develop, progress to harder vegetables like potatoes and squashes that require greater knife pressure and control.
Essential Tools and Safety Equipment
Beyond your knife, you’ll need a high-quality cutting board that doesn’t slip on your counter. A 12×18-inch wooden or plastic cutting board provides adequate workspace for practicing knife skills with various vegetables. Avoid glass cutting boards because they’re hard on your knife and can cause slipping.
A honing steel is one of the most underrated tools for maintaining knife safety during practice. A dull knife is actually more dangerous than a sharp one because it requires excessive pressure and is more likely to slip off hard vegetables. Hone your knife before each practice session using quick, smooth strokes at a 15-degree angle. This takes 30 seconds but significantly improves your cutting experience.
Consider investing in a knife sharpener for when honing is no longer sufficient to maintain your blade’s edge. A whetstone offers the best results but requires practice to use properly, while pull-through sharpeners are more forgiving for beginners. Maintaining a sharp knife is perhaps the single most important safety investment you can make.
Setting Up Your Safe Practice Space
Your practice environment significantly impacts your safety and learning potential. Choose a quiet space where you can focus completely on your technique without distractions. A kitchen counter at proper height with good lighting allows you to see your knife positioning clearly.
Keep your practice space clear of clutter. You need at least 24 inches of clear counter space on both sides of your cutting board for comfortable movement. Remove phones, papers, and other items that might distract you or cause you to move suddenly while holding a sharp knife.
Ensure your cutting board is completely stable before beginning practice. A damp cloth under your cutting board prevents slipping and keeps your entire practice environment safer. Some experts recommend a cutting board mat designed to grip countertops, which provides extra stability during intensive practice sessions.
Pro Tips for Practice Knife Skills Safely at Home Claw Grip Tip
Invest in Practice: Consider dedicating just 15 minutes twice a week to deliberate knife skills practice. This structured approach builds skills faster than occasional cooking prep because you’re focusing entirely on technique rather than recipe execution. Your hands will develop muscle memory that makes everyday cooking easier and faster.
Maintain Consistent Pressure: Many beginners either press too hard or too softly when first learning. The knife should do the work—your hands simply guide it through the vegetable with steady, even pressure. If you’re straining or squeezing tightly, you’re using too much force. Relax your shoulders and let the blade’s sharpness be your primary cutting tool.
Record Your Progress: Use your smartphone to video your knife work from the side view. Watching playback reveals hand positioning issues that you can’t see while actively cutting. Over several weeks, you’ll notice your movements becoming smoother and more confident, providing concrete evidence of your improvement.
Practice the Grip Without Cutting: Before using a sharp knife, practice the claw grip repeatedly with a butter knife or wooden blade. This allows you to build muscle memory without any risk. Spend 5 minutes doing this before each practice session to ensure your hand automatically assumes the proper protective position.
Maintain Your Mental Approach: Approach practice sessions with calm focus rather than trying to achieve speed. The claw grip becomes second nature through patient repetition, not through pushing yourself too hard. If you feel frustrated or tense, take a break and return when you’re calm and focused.

Common Mistakes to Avoid
Gripping Too Tightly: The most common beginner mistake is holding the knife with a death grip, which leads to hand fatigue and actually reduces control. Your grip should be firm but relaxed, with your fingers wrapped comfortably around the handle. Tension in your hand translates to tension in your arm and shoulder, which ironically makes you less safe.
Rushing Your Practice: Many people treat knife practice like they’re trying to win a competition. Professional chefs didn’t develop their skills overnight, and neither will you. Slow, deliberate cuts with perfect form will eventually lead to faster, equally perfect cuts. Rushing introduces sloppy technique that becomes habit, which is counterproductive to your goals.
Neglecting the Claw Grip: Some practitioners skip the claw grip once they feel more confident, thinking they can rely on experience instead. This is precisely how experienced home cooks get injured. The claw grip is not training wheels—it’s professional-grade safety that protects your hands regardless of how skilled you become.
Using Inappropriate Knives: Practice knives that are too small, dull, or poorly balanced compound learning difficulties and safety risks. Invest in a quality knife from the beginning rather than learning on cheap knives you’ll eventually discard. A good knife makes learning easier and faster while keeping you safer throughout the process.
Cutting on Unstable Surfaces: A cutting board that slips or moves undermines all your careful safety preparation. Always ensure your board is completely stable before beginning cuts. The two seconds it takes to check stability prevents accidents that could derail your entire practice schedule.
Ignoring Finger Fatigue: Your hands will get tired during practice, especially if you’re not accustomed to holding a knife for extended periods. Stop practicing when your hands begin to fatigue because tired hands make mistakes. It’s better to practice consistently for shorter periods than to push through fatigue, which leads to poor technique and potential injuries.
Key Takeaways
- The claw grip is a proven safety technique that protects your fingers by curling them behind your knuckles, which guide the knife blade through proper positioning
- Start your knife skills practice with soft vegetables and progress gradually to harder items as your confidence and technique improve
- A sharp, well-balanced chef’s knife between 8-10 inches is ideal for home practice because it’s manageable for beginners yet professional enough for developing real skills
- Consistent, deliberate practice focused on perfect form leads to faster skill development than trying to achieve speed immediately
- Regular maintenance of your knife through honing and sharpening is essential for both safety and the quality of your cuts
- Your practice environment should be stable, well-lit, and free of distractions to allow complete focus on technique development
- Mental approach matters significantly—patience and calm focus develop skills faster than rushing or anxiety-driven practice
Frequently Asked Questions About Practice Knife Skills Safely at Home Claw Grip Tip
Q: What is the best practice knife skills safely at home claw grip tip technique for beginners?
A: The best technique for beginners is to start with the claw grip on soft vegetables like bell peppers, making slow, deliberate slicing motions while the flat of the blade rests against your middle knuckles. Focus entirely on maintaining proper hand position and consistent cutting depth rather than speed. Spend 15-20 minutes practicing just this basic slicing motion before attempting more complex cuts. This foundational approach builds safe habits that protect you throughout your entire cooking career.
Q: How do I use practice knife skills safely at home claw grip tip in my everyday cooking?
A: The claw grip becomes automatic through regular practice, transitioning seamlessly into your everyday cooking once you’ve spent several weeks developing the habit. Begin integrating the grip into your regular meal prep, starting with one ingredient per meal where you deliberately apply the technique. Over time, you’ll find yourself naturally assuming the claw grip for all your cutting work without consciously thinking about it. This integration means your everyday cooking becomes safer while your skills continuously improve.
Q: How long does it take to develop proficient knife skills?
A: Most people develop comfortable, proficient knife skills with 15-20 minutes of dedicated practice twice weekly for 8-12 weeks. However, mastery—the kind professional chefs possess—requires years of consistent practice and refinement. The important thing is that basic safety and efficiency develop relatively quickly. Many home cooks report that they feel confident with proper knife work within just four weeks of consistent practice, which is encouraging for beginners.
Q: What’s the difference between honing and sharpening a knife?
A: Honing realigns the microscopic teeth on your blade’s edge, which takes just 30 seconds and should be done before each practice session or use. Sharpening removes metal to create a completely new edge, which is required only every few months depending on use frequency. Honing maintains your knife’s performance between sharpenings, making it the more frequent maintenance task. Both are essential to keeping your practice knife performing optimally and safely.
Q: Can I practice knife skills with any type of knife?
A: While you technically can practice with any knife, a quality chef’s knife provides the best learning experience and safety. Serrated knives, steak knives, and cheap knives either don’t perform as expected or develop bad habits in your technique. Invest in a single quality chef’s knife that will serve you well for years. It’s one of the best investments you can make for both your cooking and your safety.
Conclusion
Learning how to practice knife skills safely at home claw grip tip is an investment in both your safety and your culinary joy. The techniques outlined in this guide—particularly the protective claw grip combined with proper knife selection and deliberate practice—provide a comprehensive foundation for developing professional-grade knife skills in your home kitchen. By dedicating just 15-20 minutes twice weekly to focused practice, you’ll develop muscle memory that transforms every cooking experience into something faster, safer, and more enjoyable. Start this week with soft vegetables, maintain your commitment to the claw grip, and watch as your confidence grows with each practice session. Your hands will thank you, and your cooking will never be the same.
Recommended Products on Amazon
As an Amazon Associate I earn from qualifying purchases.