How to declutter a kitchen in one afternoon
How to Declutter Kitchen One Afternoon Sort Donate Discard: 7 Essential Steps for Success
Introduction
Learning how to declutter kitchen one afternoon sort donate discard is one of the most transformative projects you can tackle in your home, and it’s absolutely achievable in just a few hours. A cluttered kitchen doesn’t just look chaotic—it impacts your cooking experience, wastes valuable counter space, and makes meal preparation frustratingly inefficient. Whether you’re drowning in gadgets you never use, duplicate utensils, or expired pantry items, this comprehensive guide will walk you through the entire decluttering process. By the end of this afternoon-long project, you’ll have a streamlined, functional kitchen that sparks joy and makes cooking a genuine pleasure. Let’s transform your kitchen together and reclaim that precious space.
Table of Contents
- Introduction
- Why Declutter Kitchen One Afternoon Sort Donate Discard Matters
- Step-by-Step Declutter Kitchen One Afternoon Sort Donate Discard Guide
- Best Declutter Kitchen One Afternoon Sort Donate Discard Options
- Pro Tips for Declutter Kitchen One Afternoon Sort Donate Discard
- Common Mistakes to Avoid
- Key Takeaways
- Frequently Asked Questions About Declutter Kitchen One Afternoon Sort Donate Discard
- Conclusion
Why Declutter Kitchen One Afternoon Sort Donate Discard Matters
A cluttered kitchen impacts far more than just aesthetics. When you can’t find the tools you need, cooking becomes frustrating and time-consuming, and you’re more likely to order takeout instead of preparing healthy meals at home. Studies show that an organized space reduces stress and anxiety, allowing you to approach daily tasks with a clearer mind and better focus. Beyond the mental benefits, a decluttered kitchen is more hygienic—you’ll easily spot expired foods, prevent pest infestations, and eliminate hidden bacteria breeding grounds in forgotten corners.
Learning to declutter kitchen one afternoon sort donate discard also saves you money. Once you know exactly what you own, you stop buying duplicates and unnecessary gadgets that seemed essential at the time. You’ll be shocked at how many “one-use” tools are hiding in your drawers—garlic presses, spiralizers, bread makers—all taking up precious real estate. This project helps you become a more intentional consumer and prevents future impulse purchases.
The efficiency gains are remarkable. Studies show that organized kitchens reduce meal preparation time by 20-30%, making weeknight cooking feel less like a chore. When everything has a designated home and you can access it immediately, you’ll actually use your quality cookware and ingredients. Additionally, a clean, organized kitchen is more enjoyable to spend time in, encouraging you and your family to cook together more often and enjoy home-cooked meals.
Step-by-Step Declutter Kitchen One Afternoon Sort Donate Discard Guide
Step 1: Set a Timer and Establish Your Zones
Start by setting a firm time limit—three to four hours is ideal for a thorough afternoon decluttering session. Divide your kitchen into clear zones: utensil drawers, cabinets, pantry, appliances, and countertops. Tackle one zone at a time to avoid feeling overwhelmed and to maintain momentum throughout the afternoon.
Before beginning, gather your supplies: three large boxes or bags labeled “Keep,” “Donate,” and “Discard,” plus trash bags for broken items. Have a notepad ready to jot down items you genuinely need to purchase later. Clear a large work surface—your dining table is perfect—as a staging area for sorting items.
Step 2: Attack Your Utensil Drawers
Pull out every single item from your utensil drawers and place them on your work surface. Now comes the honest assessment: do you actually use this? If you haven’t used it in the past six months, it’s taking up valuable space. Broken handles, missing pieces, or dull knives should go straight into the “Discard” box.
The utensil drawer is where most people discover they own five spatulas, three wooden spoons, and multiple sets of measuring spoons. Keep only one or two of each essential tool. Donate quality duplicates to a food bank, thrift store, or friend who’s setting up a new kitchen.
Use drawer dividers to create designated spaces for different utensil types. This prevents the “jumbled mess” that typically happens and makes it easy to maintain your organization long-term. Invest in a simple wooden or bamboo utensil organizer that separates spoons, spatulas, and other tools into distinct compartments.
Step 3: Reorganize Your Cabinets Strategically
Now tackle your cabinets, working through one at a time. Remove everything and assess each item’s condition and usefulness. Cloudy glasses, chipped plates, and mismatched bowls should be evaluated honestly—do you genuinely use them, or are you keeping them “just in case”?
Stack similar items together and create a system. Plates should be vertical rather than stacked to prevent breakage and make selection easier. Bowls of similar sizes nest together, and glasses group by type. The key principle: if you can’t see it easily, you won’t use it, so avoid deep stacks where items disappear.
For pots and pans, keep only what you actually cook with regularly. Many people own seven saucepans but use only three. Be ruthless here—that specialized fish poacher or copper fondue pot probably isn’t earning its cabinet real estate. Donate quality cookware to thrift stores where someone will appreciate it.
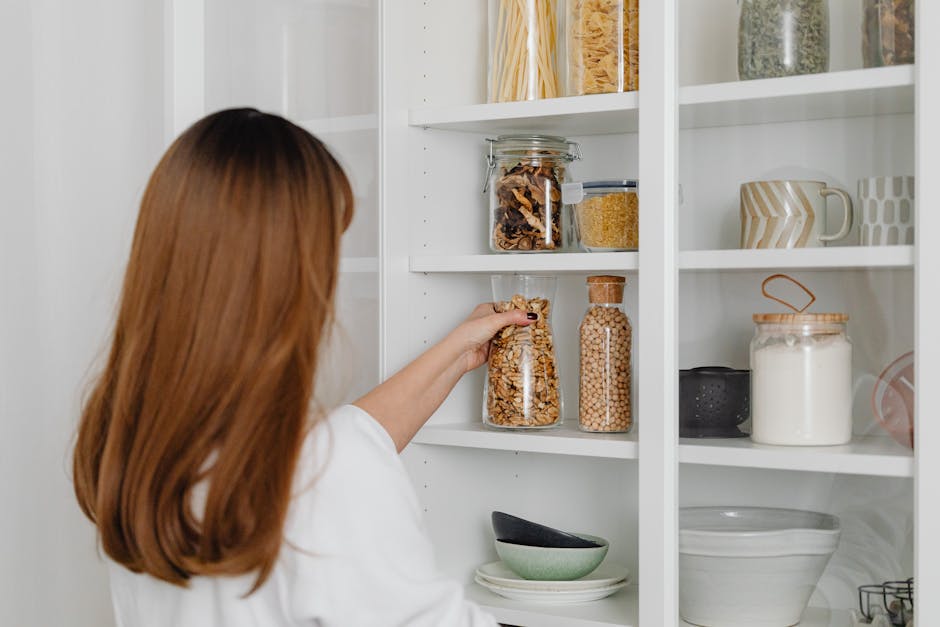
Step 4: Purge Your Pantry Completely
The pantry is where expired foods hide and clutter accumulates fastest. Empty every shelf, checking expiration dates on everything. Anything expired, open for more than a few months, or in damaged packaging goes directly to “Discard.” Don’t feel guilty—expired food is useless and potentially unsafe.
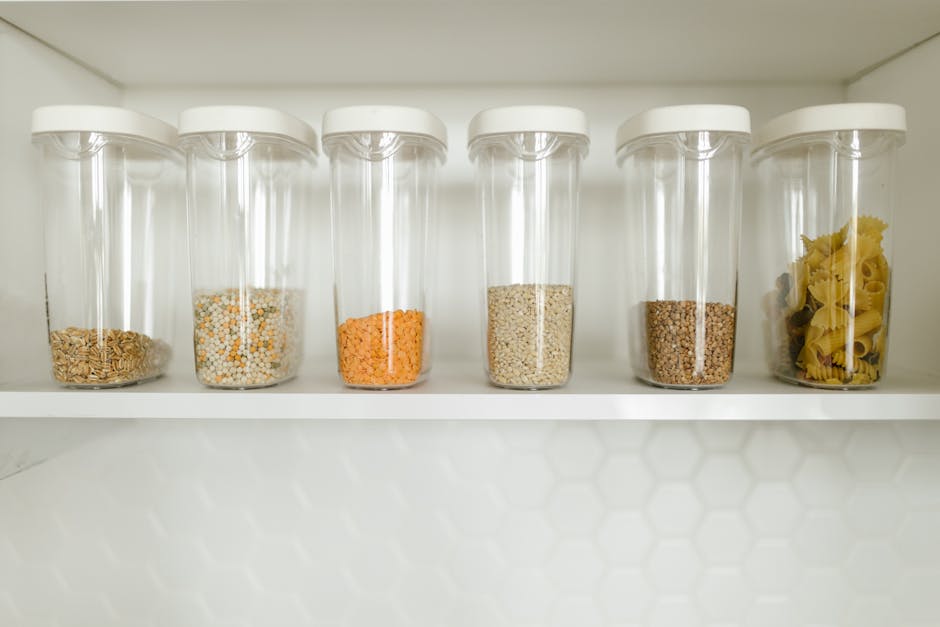
Group like items together: all cereals in one section, canned goods in another, baking supplies together. Use clear containers with labels for frequently used items like flour, sugar, pasta, and rice. This prevents buying duplicates and makes it easy to see when items are running low. The rule of thumb: if you can’t see it, it doesn’t exist in your kitchen.
Remove packaging from bulky items and consolidate half-empty boxes into proper storage containers. That box of crackers taking up a full shelf? Transfer it to a space-saving container with a label showing the expiration date. This simple step can reclaim 30-50% of your pantry space immediately.
Step 5: Evaluate Your Appliances and Gadgets
Small kitchen appliances are notorious space-hogs. Pull them all out and ask yourself: have I used this in the past year? That bread maker, ice cream maker, panini press, or specialty blender might be tempting, but are they truly part of your regular cooking routine?
Keep multi-functional appliances that you use frequently. A quality blender that you use for smoothies, soups, and sauces earns its counter or cabinet space. A specialty gadget used once per year? It should go. Be especially critical of “unitaskers”—tools designed for only one purpose that you can accomplish with basic equipment.
Clean and test appliances before deciding to keep them. A non-functioning mixer or broken coffee maker shouldn’t take up space. Donate working appliances in good condition to shelters, community centers, or second-hand shops.
Step 6: Conquer Your Countertops
Ideally, your kitchen countertops should be mostly clear, with only frequently used items displayed. Everything else should have a designated home in drawers or cabinets. Remove clutter gradually and assess what truly needs to stay: your coffee maker, perhaps a utensil holder, and a cutting board station.
Items that should stay on counters: daily essentials like coffee makers or toasters, frequently used utensils, and attractive serving pieces. Everything else—junk drawers disguised as decorative bowls, old mail, random gadgets—should be filed away properly or discarded. Clear countertops make your kitchen feel twice as large and infinitely more peaceful.
Implement a “clean sweep” every evening before bed. Spend five minutes putting things back in their designated homes and wiping down surfaces. This maintenance prevents clutter from accumulating again and keeps your newly organized space functional.
Step 7: Final Sort and Decision Making
Now it’s time to commit to your final decisions. Go through your “Keep” pile one more time and be honest about whether each item truly belongs. Look at your “Donate” pile and feel proud—these quality items will find good homes and help others. Your “Discard” pile can be taken out immediately.
Create a plan for your donations immediately. Schedule a drop-off at your local thrift store, post items on community sharing sites, or arrange a pickup with a clothing/furniture charity. Don’t let donation boxes sit around for weeks—the sooner you remove them, the sooner you’ll see your actual space and feel the accomplishment.

Best Declutter Kitchen One Afternoon Sort Donate Discard Options
When decluttering, the tools and systems you choose directly impact your success. The best approach combines practical storage solutions with honest decision-making about what stays and goes. Several proven methods work well for different kitchen layouts and personal styles.
The “Container Store” method involves investing in matching, clear containers and drawer organizers. While this requires some upfront investment, it creates a cohesive look and makes finding items effortless. Transparent containers let you see contents without opening, preventing duplicate purchases.
The “Vertical Storage” method maximizes cabinet and wall space. Wall-mounted shelves, hanging pot racks, and over-the-door organizers pull items out of cabinets and make them more accessible. This method works best for frequently used items and creates an attractive, functional display.
The “One-In-One-Out” system prevents future clutter. Every time you bring a new kitchen tool or gadget home, something of similar utility must leave. This single rule prevents the gradual accumulation that leads to overflowing cabinets and cluttered countertops.
The “Seasonality” approach acknowledges that some tools are only used occasionally. Holiday cookie cutters, specialty grilling tools, or canning supplies can be stored in a separate cabinet or closet, rotating them in and out as needed. This keeps everyday tools accessible while preserving specialty items.
Many people find success with the “Donation Station” method. Designate a box or basket where questionable items go during normal kitchen use. At month’s end, evaluate the box’s contents—if you haven’t retrieved items, they’re genuinely not needed. This reduces regret about discarding items you might miss.

Pro Tips for Declutter Kitchen One Afternoon Sort Donate Discard
Involve Family Members: If you cook with a partner or family members, include them in the decluttering process. Someone else might love an appliance you’ve never used, and you’ll gain insight into how others actually use the kitchen. Their input prevents discarding items that are genuinely useful to them.
Take Before and After Photos: Document your project from start to finish. Before photos show just how cluttered things were, while after photos serve as motivation to maintain your new system. Share your transformation on social media for accountability and to inspire others.
Sell Items for Cash: High-value kitchen tools, rarely-used appliances, and quality cookware can be sold on Facebook Marketplace, OfferUp, or eBay. Even selling items for 25-50% of original price provides motivation to let go, and the cash can fund purchases you actually need.
Create a “Favorite Tools Only” Space: Designate one drawer or cabinet for your absolute favorite, most-used kitchen tools. This becomes your go-to spot and keeps treasured items immediately accessible. Everything else finds secondary homes organized by category.
Measure Before Reorganizing: Before purchasing organizing solutions, measure your cabinet and drawer dimensions. Nothing is more frustrating than buying dividers or containers that don’t fit properly. Accurate measurements prevent wasted money and ensure your organizational system works perfectly.
Label Everything: Even if you think you’ll remember where items belong, labels prevent confusion and help family members maintain your system. Use a label maker for a professional look, or create handwritten labels for a more personal touch. Color-coding by category adds visual appeal.
Use Vertical Space Aggressively: Wall space is often unused in kitchens. Install shelves, hanging racks, or magnetic strips to pull frequently used items out of cabinets. This makes your kitchen feel larger while keeping essential tools within arm’s reach.

Common Mistakes to Avoid
The biggest mistake people make when decluttering is keeping items “just in case.” That specialty pan you might use someday, the set of glasses you’re saving for company, or gadgets you’ll definitely learn to use all represent potential clutter. If you haven’t used something in a year, you likely won’t, and it’s taking up space you could use for items you actually enjoy.
Another common error is organizing before decluttering. Many people buy beautiful storage containers and drawer organizers, only to fill them with items they don’t actually need. This creates an organized mess—neat-looking, but still cluttered. Always declutter first, then purchase organizational tools sized appropriately for your remaining items.
Underestimating the time required is another frequent problem. While you can do a basic declutter in an afternoon, doing it thoroughly and thoughtfully might take a bit longer. Better to spend 4-5 focused hours than rush through and miss opportunities to truly streamline your kitchen.
Some people struggle with emotional attachment to items. A kitchen gadget gifted by a grandmother, cookbooks from a cooking class, or specialty equipment you invested in represent more than objects—they hold memories. Consider keeping one meaningful item but letting go of duplicates. Photograph items before donating them to preserve memories without preserving clutter.
Finally, avoid the mistake of not maintaining your system. After all that hard work, it’s easy to slip back into cluttered habits. Implement the five-minute evening reset ritual and the one-in-one-out rule to keep your kitchen organized long-term.
Key Takeaways
- Set a specific time limit of 3-4 hours to maintain focus and momentum throughout your afternoon decluttering session
- Use the sort, donate, discard method with clearly labeled boxes to make decisions quickly without second-guessing yourself
- Tackle one zone at a time whether that’s drawers, cabinets, pantry, or countertops to avoid overwhelm and maintain progress
- Invest in organizational tools only after decluttering to ensure you’re sizing storage solutions appropriately for items you actually keep
- Implement maintenance systems like the one-in-one-out rule and daily five-minute resets to prevent future clutter accumulation
Frequently Asked Questions About Declutter Kitchen One Afternoon Sort Donate Discard
Q: What is the best approach to declutter kitchen one afternoon sort donate discard?
A: The best approach combines three essential steps: sort items into keep, donate, and discard categories; make honest decisions about what you actually use; and immediately remove items from your home. Work zone by zone through your kitchen rather than tackling everything simultaneously. Set a specific time limit, use clear labeling systems, and enlist family members for input on shared items. The key is momentum—continuous progress for 3-4 focused hours accomplishes more than multiple short sessions stretched over weeks.
Q: How do I decide what to donate versus discard when I declutter kitchen one afternoon sort donate discard?
A: Donate items that are clean, functional, and in good condition but unused by you. Quality cookware, working appliances, and useful gadgets can find value with others through thrift stores, shelters, or community sharing sites. Discard broken items, expired foods, mismatched pieces, and anything damaged or unsafe. If something won’t be useful to someone else, it belongs in the trash, not taking up donation center space. Think of donation as a way to help others while discard addresses items with no further usefulness.
Q: How long does it actually take to declutter kitchen one afternoon sort donate discard?
A: Most kitchens can be thoroughly decluttered in 3-4 focused hours. Small kitchens might take 2-3 hours, while large kitchens with extensive cabinets and pantries might need 4-5 hours. The key is setting a specific time limit and maintaining momentum. Working with a partner or friend can accelerate the process, as you can tackle multiple zones simultaneously and make decisions faster with someone else’s perspective.
Q: What organizational tools should I buy after I declutter kitchen one afternoon sort donate discard?
A: Wait until after you’ve finished decluttering to purchase organizational tools. Then choose based on your actual remaining items and available space. Clear containers for pantry items, drawer dividers for utensils, and cabinet organizers are essential. Measure your spaces first to ensure purchases fit properly. Quality bamboo or stainless steel organizers last longer than plastic options and look more attractive while maintaining function.
Q: How do I prevent my kitchen from becoming cluttered again after decluttering one afternoon?
A: Implement two key habits: the one-in-one-out rule where every new item requires removing something similar, and a daily five-minute reset before bedtime. These simple practices prevent gradual clutter accumulation. Additionally, be intentional about new purchases—evaluate whether you truly need something before bringing it home, resist impulse buys at kitchen stores, and remember the space you fought so hard to create.
Conclusion
Learning how to declutter kitchen one afternoon sort donate discard is one of the most rewarding home projects you can tackle, transforming not just your kitchen but your entire cooking experience. This afternoon-long project might seem daunting initially, but with a clear system, focused effort, and honest decision-making, you’ll be amazed at what you accomplish. Your newly organized kitchen will feel larger, function more efficiently, and become a genuinely enjoyable space to spend time in. The real value isn’t just the organized cabinets or empty countertops—it’s the lasting peace of mind and the daily joy of working in a clutter-free space. Start this afternoon, commit fully for three to four hours, and reclaim the kitchen you deserve. Your future self will thank you every single time you cook.
Recommended Products on Amazon
As an Amazon Associate I earn from qualifying purchases.