How to make cinnamon rolls from scratch
The Ultimate Cinnamon Roll Scratch Recipe Dough Fill Roll Proof Guide: Master Homemade Cinnamon Rolls Today
Learning how to make the perfect cinnamon roll scratch recipe dough fill roll proof technique is an essential skill that will transform your baking game forever. Whether you’re a seasoned baker or a complete beginner, mastering this comprehensive guide will enable you to create bakery-quality cinnamon rolls right in your own kitchen. These delicious treats are perfect for weekend breakfasts, special occasions, or whenever you want to impress family and friends with homemade goodness. The process may seem intimidating at first, but breaking it down into manageable steps makes it completely achievable. By the end of this tutorial, you’ll understand every stage from mixing dough to achieving that perfect golden-brown finish.
Table of Contents
- Why Cinnamon Roll Scratch Recipe Dough Fill Roll Proof Matters
- Step-by-Step Cinnamon Roll Scratch Recipe Dough Fill Roll Proof Guide
- Best Cinnamon Roll Scratch Recipe Dough Fill Roll Proof Options
- Pro Tips for Cinnamon Roll Scratch Recipe Dough Fill Roll Proof
- Common Mistakes to Avoid
- Key Takeaways
- Frequently Asked Questions about Cinnamon Roll Scratch Recipe Dough Fill Roll Proof
- Conclusion
Why Cinnamon Roll Scratch Recipe Dough Fill Roll Proof Matters
Creating cinnamon rolls from scratch is fundamentally different from using pre-made dough or store-bought versions. When you understand the cinnamon roll scratch recipe dough fill roll proof methodology, you gain complete control over every ingredient, texture, and flavor profile in your finished product. This knowledge empowers you to customize sweetness levels, adjust spice ratios, and ensure the highest quality components go into your baking.
The dough itself is where the magic begins. Making dough from scratch allows you to incorporate fresh yeast, quality butter, and premium milk that you’ve selected personally. Unlike commercial products that may contain preservatives and additives, your homemade dough will be fresher and more flavorful. The texture you achieve will be noticeably superior to anything you can buy, with a tender crumb and superior moisture retention.
Understanding how to properly fill your cinnamon rolls ensures even distribution of that cinnamon-sugar mixture throughout each swirl. The filling is what people crave most in a cinnamon roll—that perfect balance of sweetness and warm spice. When you know the correct filling ratios and application techniques, you’ll create rolls that look professional and taste exceptional.
The proofing stage is crucial because it determines whether your rolls will be light and fluffy or dense and heavy. Proper cinnamon roll scratch recipe dough fill roll proof techniques ensure your dough rises to the perfect volume, creating that signature pillowy texture. Temperature control, timing, and humidity all play significant roles in achieving optimal results during this critical stage.
Having mastered these techniques, you’ll discover that homemade cinnamon rolls are more cost-effective than buying from bakeries over time. You’ll also experience the profound satisfaction that comes from creating something truly delicious with your own hands. This skill becomes a valuable addition to your baking repertoire that you’ll use repeatedly throughout your life.
Step-by-Step Cinnamon Roll Scratch Recipe Dough Fill Roll Proof Guide
Ingredients You’ll Need
Before beginning your cinnamon roll scratch recipe dough fill roll proof process, gather all necessary ingredients. For the dough, you’ll need one cup of whole milk (warmed to 110°F), one-quarter ounce of active dry yeast (about 2 and one-quarter teaspoons), one-third cup of granulated sugar, one-quarter cup of butter (softened), one teaspoon of salt, one large egg, and three and one-half cups of all-purpose flour. For the filling, prepare one-half cup of butter (softened), one cup of brown sugar, and two and one-half tablespoons of ground cinnamon.
For the cream cheese frosting, gather four ounces of cream cheese (softened), two tablespoons of butter (softened), one cup of powdered sugar, and one-half teaspoon of vanilla extract. Having everything measured and ready before you start (known as mise en place in cooking) will make your process smooth and stress-free.
Step 1: Activate Your Yeast
Begin by pouring your warmed milk into a large mixing bowl and add the yeast directly to the milk. Let this mixture sit for five minutes to allow the yeast to activate and become foamy. This foaming indicates that your yeast is alive and active, which is essential for proper rising and fermentation.
Add your granulated sugar, softened butter, salt, and egg to the yeast mixture and stir well. Mix these ingredients thoroughly until they’re well combined and the butter is mostly incorporated. The mixture should look somewhat lumpy at this stage, and that’s perfectly normal.
Step 2: Develop Your Dough
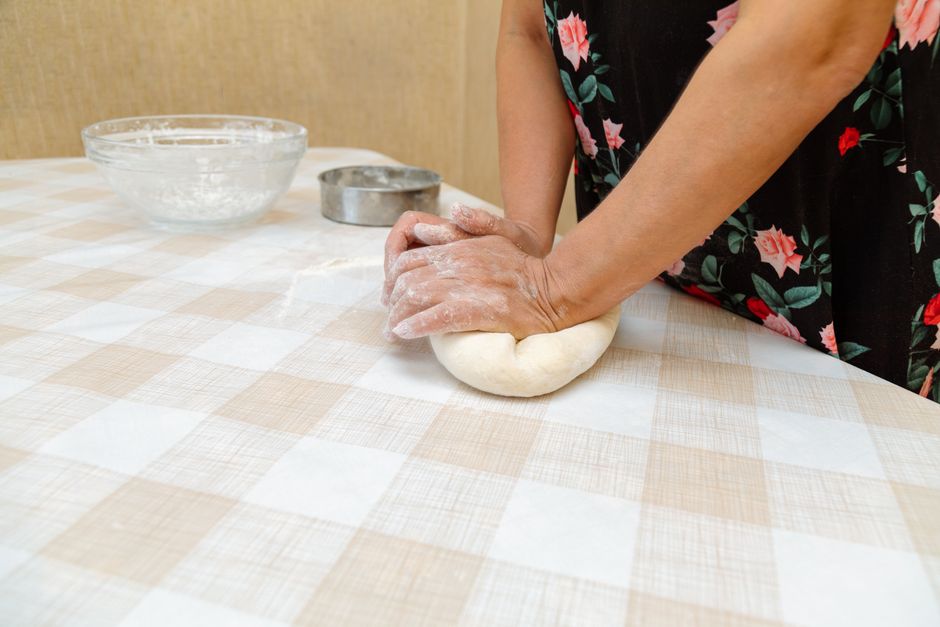
Begin adding your flour gradually, one cup at a time, mixing thoroughly after each addition. The dough will start out very sticky, but as you add more flour, it will become more manageable. Once you’ve added all the flour, the dough should come together into a shaggy mass that pulls away from the sides of the bowl.
Transfer your dough to a lightly floured surface and knead for approximately eight to ten minutes. During kneading, the gluten develops, creating a smooth, elastic texture that’s perfect for rising. You’ll know your dough is properly kneaded when it’s smooth, slightly tacky, and springs back when you poke it with your finger.
Place your kneaded dough into a lightly oiled bowl, turning it to coat all sides with oil. This prevents the dough from drying out during rising. Cover the bowl with a clean kitchen towel or plastic wrap.
Step 3: First Rise
Let your dough rise in a warm location for one to one and a half hours until it doubles in size. The ideal temperature for rising is between 75°F and 80°F. If your kitchen is cool, you can place the dough in an unheated oven with the light on, which maintains a consistently warm temperature.
You’ll know the dough has risen sufficiently when it’s roughly double its original volume and jiggles slightly when you gently shake the bowl. Don’t worry if it takes slightly longer than the stated time—rising times vary based on kitchen temperature and humidity levels.
Step 4: Roll and Fill Your Dough
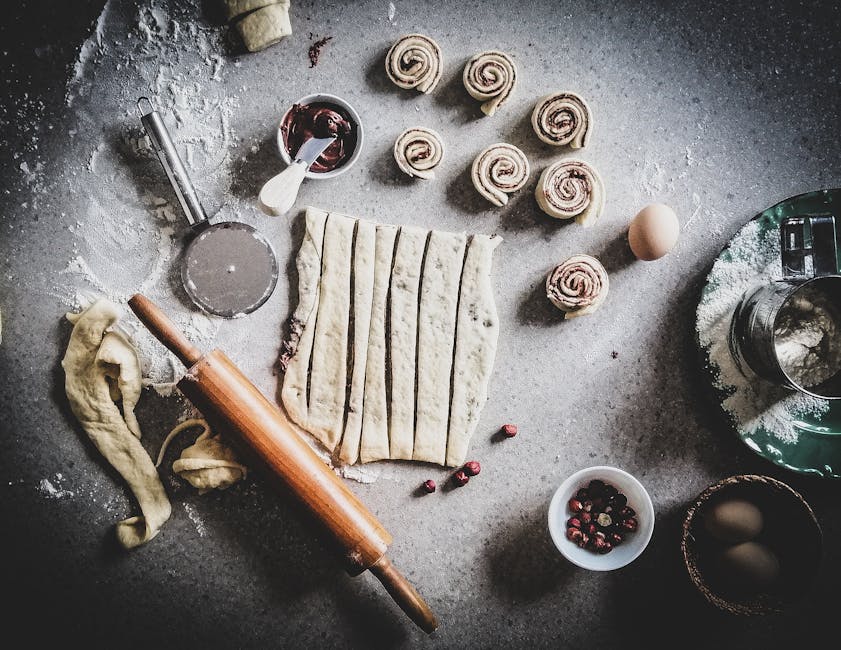
Turn your risen dough out onto a lightly floured surface and gently press it into a rough rectangle shape. Using a rolling pin, roll the dough into a twelve by sixteen-inch rectangle approximately one-quarter inch thick. The dough should be thin enough to roll easily but not so thin that it tears.
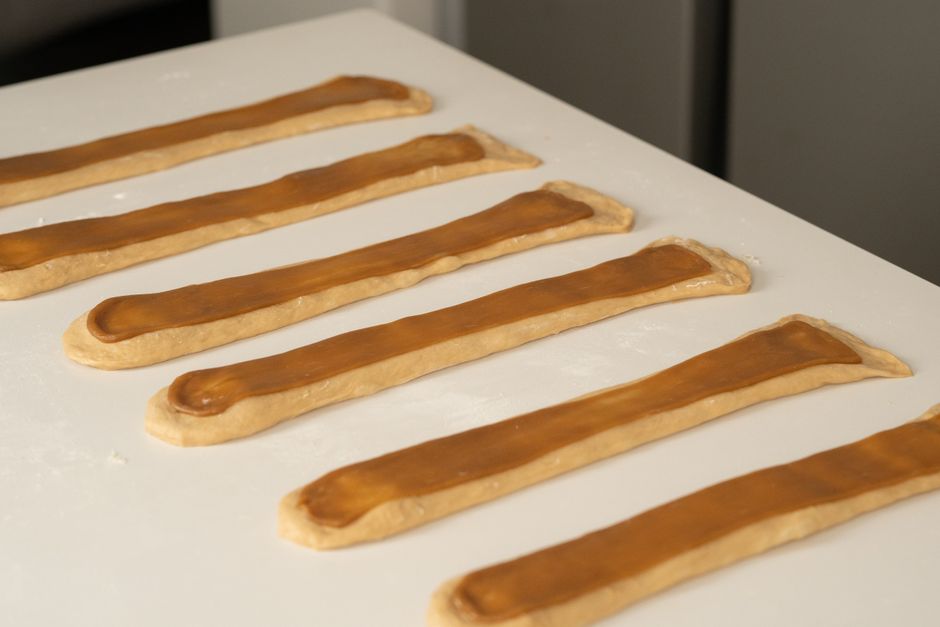
Spread your softened butter evenly across the entire surface of the dough using an offset spatula or the back of a spoon. In a small bowl, combine your brown sugar and ground cinnamon, then sprinkle this mixture evenly across the butter. Leave about one-half inch of dough uncovered at the far edge—this helps the roll seal properly.
Starting from the side closest to you, roll the dough tightly, pinching the seam as you go to seal it well. The tighter you roll, the more evenly the swirls will appear in your finished rolls. Cut your rolled dough into twelve equal pieces using a sharp knife or unflavored dental floss.
Step 5: Proof Your Rolls
Place your cut rolls into a greased nine by thirteen-inch baking dish, arranging them in three rows of four rolls each. Cover the dish loosely with plastic wrap or a kitchen towel and allow the rolls to rise for thirty minutes to one hour until puffy and light. During this second rise (called proofing), the yeast continues to work, creating additional volume and that characteristic fluffy texture.
The exact timing depends on room temperature, but generally, you want the rolls to rise until they’re visibly expanded and nearly touching each other. You can perform the “poke test”—gently poke a roll, and if the indent slowly springs back, it’s perfectly proofed.
Step 6: Bake Your Rolls
Preheat your oven to 350°F. Once your rolls are properly proofed, place the baking dish in the oven and bake for twenty to twenty-five minutes until the rolls are golden brown on top. The rolls should look puffy and feel set when you gently touch the top, though they’ll continue to soften as they cool slightly.
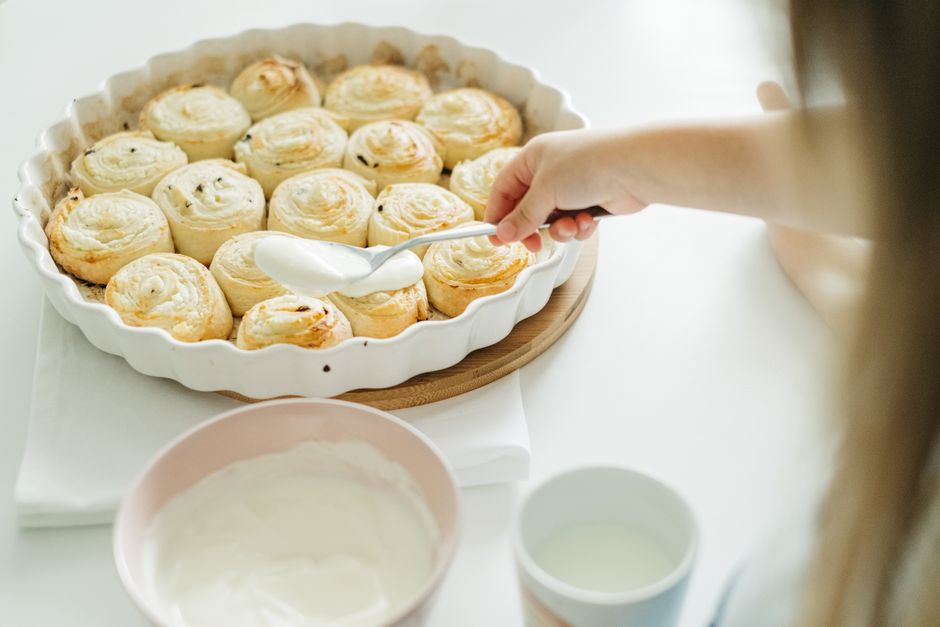
Remove the rolls from the oven and allow them to cool for just five to ten minutes before frosting. This brief cooling period prevents the frosting from melting too quickly while allowing it to adhere properly.
Step 7: Make and Apply Frosting
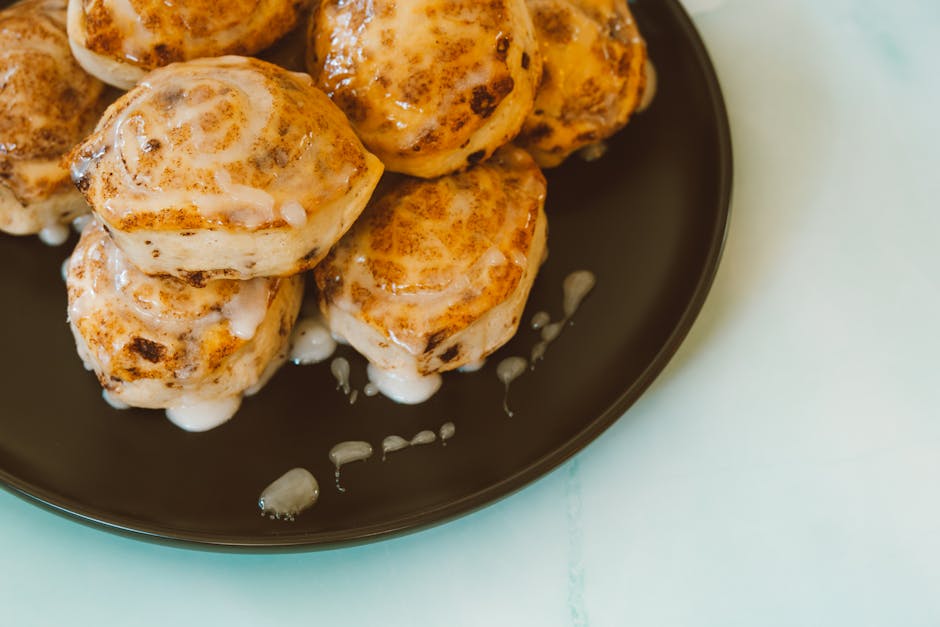
While your rolls bake, prepare your cream cheese frosting by beating the softened cream cheese and butter together until light and fluffy. Gradually add your powdered sugar and vanilla extract, beating until smooth and spreadable. The frosting should be thick enough to stay on the rolls but soft enough to spread easily.
Spread the frosting generously over your warm cinnamon rolls immediately after removing them from the oven. The warmth will help the frosting melt slightly, creating a gorgeous glaze while still maintaining its structure.
Best Cinnamon Roll Scratch Recipe Dough Fill Roll Proof Options
Traditional Method (What We’ve Covered)
The traditional cinnamon roll scratch recipe dough fill roll proof technique we’ve detailed uses active dry yeast and a straightforward two-rise process. This method is reliable, produces consistently excellent results, and allows for flexibility in timing. Many bakers prefer this approach because it’s forgiving and can be adapted to different schedules by refrigerating the dough between stages.
This classic approach yields rolls with beautiful spiral swirls and a tender, moist crumb. The two-rise system ensures adequate yeast fermentation while maintaining control over the final texture. Home bakers appreciate how this method doesn’t require specialized equipment or unusual ingredients.
Overnight Refrigerator Method
An alternative cinnamon roll scratch recipe dough fill roll proof approach involves refrigerating the formed rolls overnight before baking. Prepare your rolls as described through step five, then cover them tightly and refrigerate for eight to twelve hours. The cold temperature slows yeast activity, allowing you to bake fresh rolls in the morning.
Remove the rolls from the refrigerator thirty minutes before baking to allow them to come to room temperature and complete their proofing. This method is perfect for busy schedules since you can prepare rolls the night before and have fresh cinnamon rolls for breakfast. The extended fermentation also develops deeper, more complex flavors.
Quick Rise Method
For those needing faster results, a quick cinnamon roll scratch recipe dough fill roll proof variation uses instant yeast and warmer temperatures. Increase the yeast to one teaspoon and use 120°F milk to accelerate fermentation. Reduce the first rise to forty-five minutes and the second rise to twenty to thirty minutes.
This method works well when you need fresh cinnamon rolls quickly, though the extended fermentation of slower methods develops superior flavor complexity. The rolls will still be delicious but with slightly less developed taste profile.
Make-Ahead Freezer Method
You can prepare cinnamon rolls through the filling stage, freeze them before the second rise, and bake them later. Arrange cut rolls on a baking sheet, freeze solid, then transfer to a freezer bag for storage up to three months. When ready to bake, thaw the rolls and proof them at room temperature for one to two hours before baking as normal.
This cinnamon roll scratch recipe dough fill roll proof option is perfect for meal planning and entertaining. You’ll have fresh, homemade cinnamon rolls available whenever you need them without the time commitment on the day of baking.
Pro Tips for Cinnamon Roll Scratch Recipe Dough Fill Roll Proof
Temperature Control is Everything. The most critical factor in successful cinnamon roll scratch recipe dough fill roll proof work is maintaining proper temperature throughout the process. Use a kitchen thermometer to ensure your milk is between 105°F and 110°F—too hot and you’ll kill the yeast, too cool and fermentation will be sluggish. Similarly, choose a warm rising location, ideally between 75°F and 80°F.
Don’t Rush the Proofing Stage. The proofing process cannot be hurried without sacrificing quality. Properly proofed dough produces tender, well-risen rolls with excellent texture. Under-proofed rolls will be dense and tough, while over-proofed rolls may collapse during baking. Trust the visual cues and the poke test rather than rigid timing.
Use Quality Ingredients. The quality of your finished cinnamon rolls directly correlates with ingredient quality. Choose fresh yeast that hasn’t expired, use real butter rather than margarine, and invest in good-quality cinnamon. These seemingly minor choices make a substantial difference in your final product.
Get Your Filling Ratio Right. The most common mistake is using too little cinnamon-sugar filling, resulting in bland rolls. Use the full amounts specified, and don’t skimp on the filling ingredients. A proper filling-to-dough ratio creates that coveted cinnamon flavor throughout every bite.
Master the Rolling Technique. How you roll your dough significantly impacts your finished rolls’ appearance and texture. Roll tightly but not so tight that you crush the dough, and ensure even filling distribution. Practice makes perfect, and your second batch will look even better than your first.
Common Mistakes to Avoid
Killing Your Yeast with Hot Milk. Using milk that’s too hot is the number one reason for yeast failure. Always test milk temperature with a thermometer—the splash test isn’t reliable enough for precision. Dead yeast results in no rise and flat, disappointing rolls.
Skipping the Kneading Stage. Some home bakers try to skip kneading or use a mixer exclusively without hand kneading. While mixers help develop gluten, proper hand kneading creates the ideal dough texture and structure. Don’t rush this essential step.
Uneven Filling Distribution. Spreading filling unevenly means some rolls will be flavor-packed while others are bland. Take time to distribute your cinnamon-sugar mixture evenly across the entire dough surface. This small effort dramatically improves the final result.
Cutting Rolls with a Dull Knife. Using a dull knife squeezes the dough rather than cutting cleanly, resulting in uneven rolls that bake inconsistently. Use a sharp serrated knife or dental floss for clean cuts that help your rolls maintain their shape and rise evenly.
Overbaking or Underbaking. Watch your rolls carefully toward the end of baking. Overbaking creates dry rolls with hard edges, while underbaking leaves them gummy. Your rolls should be golden brown and set but still slightly soft to the touch.
Key Takeaways
- Master the fundamentals: Understanding proper yeast activation, dough development, and proofing techniques ensures success with your cinnamon roll scratch recipe dough fill roll proof project every time
- Temperature is critical: Maintain precise temperatures for milk, rising environment, and baking to achieve optimal yeast fermentation and perfect texture
- Filling distribution matters: Evenly spreading your cinnamon-sugar mixture throughout the dough ensures consistent flavor in every roll you bake
- Don’t skip the rising stages: Allowing adequate time for both rises ensures light, fluffy rolls with excellent texture and flavor development
- Invest in quality tools: Good baking equipment like reliable thermometers, quality measuring cups, and sharp knives make the process easier and results better
Frequently Asked Questions about Cinnamon Roll Scratch Recipe Dough Fill Roll Proof
Q: What is the best cinnamon roll scratch recipe dough fill roll proof method for beginners?
A: The traditional method we’ve detailed is ideal for beginners because it’s forgiving and uses standard ingredients. The two-rise process allows flexibility, and the clear visual cues help you recognize when each stage is complete. Don’t be intimidated—this method has been successfully used for generations and works reliably when you follow the steps.
Q: How do I use cinnamon roll scratch recipe dough fill roll proof techniques if my kitchen is cold?
A: Cold kitchens significantly slow yeast fermentation. Create a warm environment by preheating your oven to 200°F, then turning it off and placing your dough inside to rise. Alternatively, use a proofing box, yogurt maker set to 75°F, or place dough near a sunny window. Warmer environments accelerate rising time, sometimes by thirty minutes or more.
Q: Can I make cinnamon roll scratch recipe dough fill roll proof dough in advance?
A: Absolutely! Prepare dough through step three, then refrigerate for up to twenty-four hours. When ready to continue, remove dough and let it come to room temperature before rolling and filling. This advance preparation works wonderfully for busy schedules and actually improves flavor through extended fermentation.
Q: Why are my rolls dense and heavy instead of fluffy?
A: Dense rolls typically result from insufficient proofing, dead yeast, or dough that wasn’t kneaded enough. Check yeast expiration dates, verify milk temperature with a thermometer, and ensure adequate kneading until dough is smooth and elastic. Also confirm that rising locations are sufficiently warm.
Q: How do I prevent my rolls from drying out after baking?
A: Store finished cinnamon rolls in an airtight container at room temperature for up to two days. For longer storage, wrap rolls individually in plastic wrap and freeze up to three months. Reheat frozen rolls by wrapping in foil and warming at 350°F for about ten minutes. Fresh rolls are best served within a few hours of baking for optimal moisture and texture.
Conclusion
Mastering how to make the perfect cinnamon roll scratch recipe dough fill roll proof process opens up a world of delicious homemade possibilities right in your kitchen. By understanding each stage from initial dough mixing through the final proofing and baking, you’ve gained the skills to create bakery-quality rolls whenever you desire. These homemade cinnamon rolls surpass anything store-bought, offering superior flavor, texture, and the immense satisfaction of serving something you’ve made yourself. Start with our detailed guide, be patient with the proofing stages, and don’t hesitate to make adjustments based on your specific kitchen conditions. Your friends and family will be amazed by these delicious homemade treats, and soon you’ll be making them regularly!
Recommended Products on Amazon
As an Amazon Associate I earn from qualifying purchases.